5. Configuring Metacat
When Metacat (Tomcat) is started, the Metacat servlet checks to see if it is configured. If not, Metacat will automatically send you to the configuration pages. You will first be asked to set up the ORCID authentication.
If the installation is new, or the previous version is before 1.9.0, pay close attention to the configuration values. If you have upgraded Metacat, and the previous version is 1.9.0 or later, Metacat will pull existing configuration settings from a backup location. You should still verify that the values are correct.
To access your Metacat, open a Web browser and type:
http://<your_context_url>
Where <your_context_url> is the URL of the server hosting the Metacat followed by the name of the WAR file (i.e., the application context) that you installed. For instance, the context URL for the KNB Metacat is: http://knb.ecoinformatics.org/knb
You can always open the configuration screen from within Metacat by typing:
http://<your_context_url>/admin
5.1. Initial Configuration & Backup Properties
Before you can log in to the Metacat Admin interface and configure it, you are required to confirm Metacat’s back-up location for the configuration settings. You will also need to set up the authentication configuration (if it is not already configured). This is required for logging in to Metacat and for defining administrative accounts.
More on configuration backup settings:
To preserve its configuration settings, Metacat backs up crucial configuration details to a directory outside the application directories.
Metacat will automatically attempt to locate an existing back-up directory, but you may need to correct the value or specify a directory (if the installation is new, or if Metacat was unable to determine the location of an existing back-up directory).
Starting from Metacat version 3.0.0, metacat.properties no longer contains any custom
settings that need to be backed up before a Metacat upgrade. Instead, custom settings are now saved
to a file named metacat-site.properties that is located outside of the tomcat webapps directory,
and so is not overwritten by deploying a new Metacat war file.
Note: If you are unable to access your Metacat admin ORCID iD and need to swap it out, instructions for Changing Authentication Configuration without Authentication are included at the end of this section.
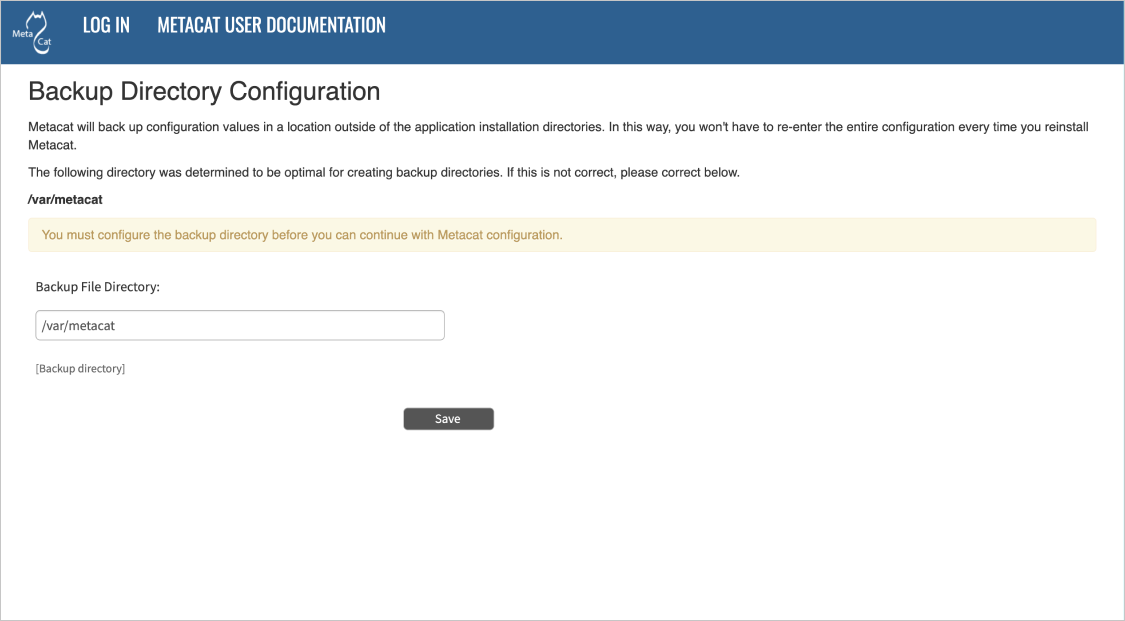
Configuring the Backup Directory.
5.2. Authentication Configuration
Whether you are installing or upgrading the Metacat servlet, you will automatically be sent to the Authentication Configuration page. You can also reach the Authentication Configuration page from a running Metacat by typing
http://<your_context_url>/admin
Starting from Metacat v3.0.0, only ORCID authentication is supported. In Metacat v2.19.0 and previous releases, an internal password file or LDAP was used as the authentication mechanism. Password-based and LDAP authentication has been deprecated. If you don’t already have an account, registering for an ORCID is simple, please visit:
After signing up for an ORCID iD, you can then use it as an admin identity when configuring authentication.
Important: Even though your ORCID iD should typically be expressed as a full https URI (e.g. https://orcid.org/0000-0001-2345-6789), it is necessary to use http-only orcid URIs when entering them in the Metacat Administrator Interface.
ex. http://orcid.org/0000-0001-2345-6789
You will not be allowed to continue with configuration if this is missing. If you require more than one Metacat administrator, multiple accounts can be entered by separating the admin identities with a semi-colon (;) character.
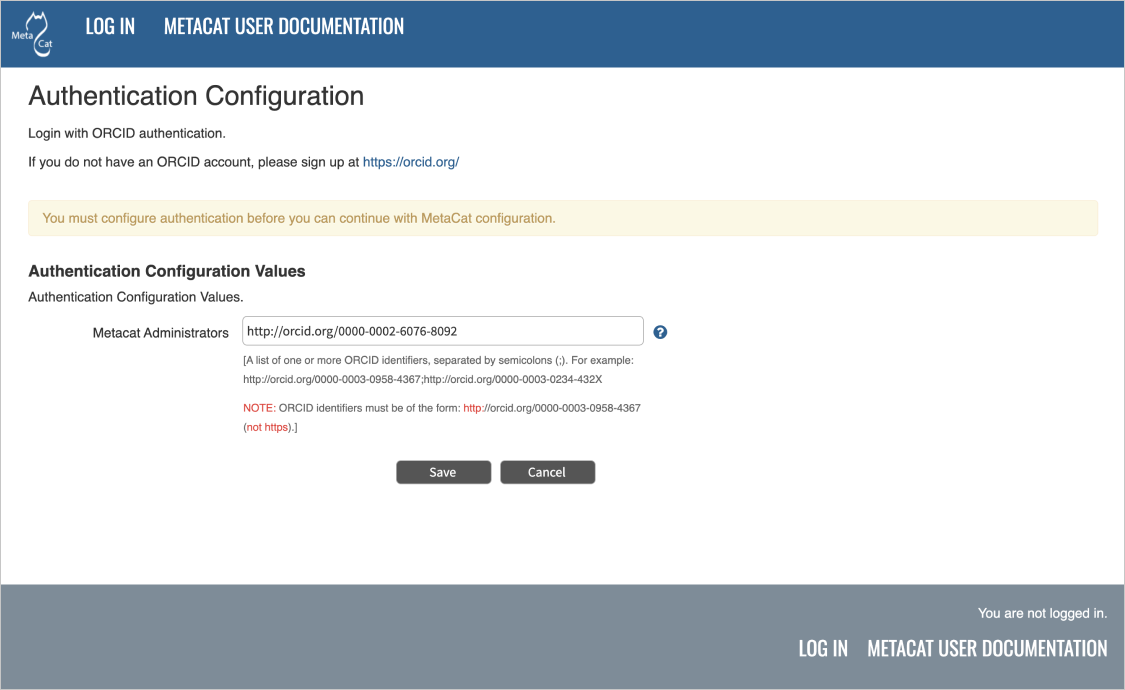
Configuring ORCID Authentication
5.3. Changing Authentication Configuration without Authentication
If you need to change or add authentication information and cannot authenticate using the existing authentication settings (e.g., the existing Metacat administrator is no longer available or you forgot the administrator password), you must edit the Metacat configuration file by hand. This ensures that only a person who has access to the Metacat server and the configuration files on that server will be able to change the administrator accounts.
To edit the authentication configuration file:
Stop Tomcat and edit the Metacat site properties (metacat-site.properties) file. The default location for this file is in /var/metacat/config/, but this path is configurable, so it may be elsewhere.
Tip: If you cannot find the metacat-site.properties file, its location is stored in a property named
application.sitePropertiesDirinside the metacat.properties file, which can be found in:<tomcat_app_dir>/<context_dir>/WEB-INF/metacat.properties (where the <context_dir> is the application context, usually named "metacat".)See Properties Overview for details
2. Once you have located metacat-site.properties, change the following properties appropriately (or add them if they do not already exist)
auth.administrators - a semicolon-separated list of administrators' ORCID iDs
Save the metacat-site.properties file and start Tomcat.
5.4. Logging in to Metacat
In order to configure Metacat, you must log in with an administrative account (ex. ORCID iD) that has been configured in the Authentication Configuration settings. If you did not set up the correct administrative user there, you must change the authentication configuration by hand before you can log in.
In the log-in screen, click “Sign in with ORCID”. You will be redirected to ORCID’s login screen and back to Metacat after successfully signing in with the correct administrative account.
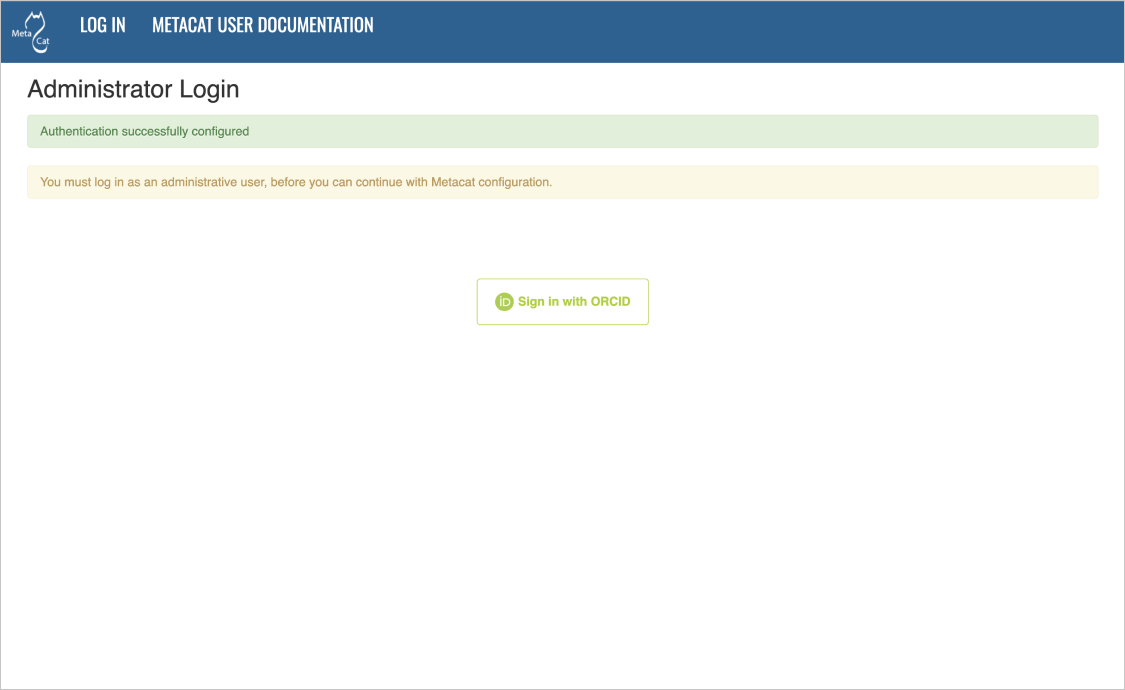
Logging into Metacat.
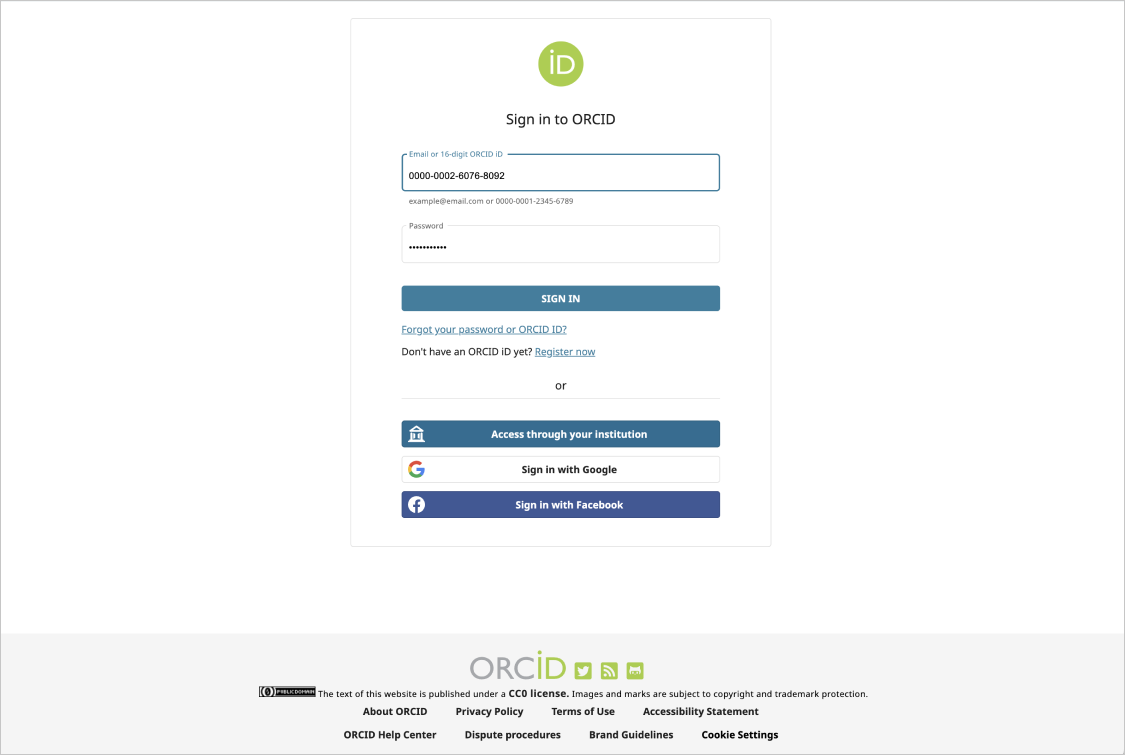
Sign into ORCID with the adminstrative account set during the auth configuration process.
5.5. Required Configuration
All required Metacat settings can be accessed from the Metacat Configuration utility, which becomes available after the initial configurations have been specified and an authorized administrator logs in.
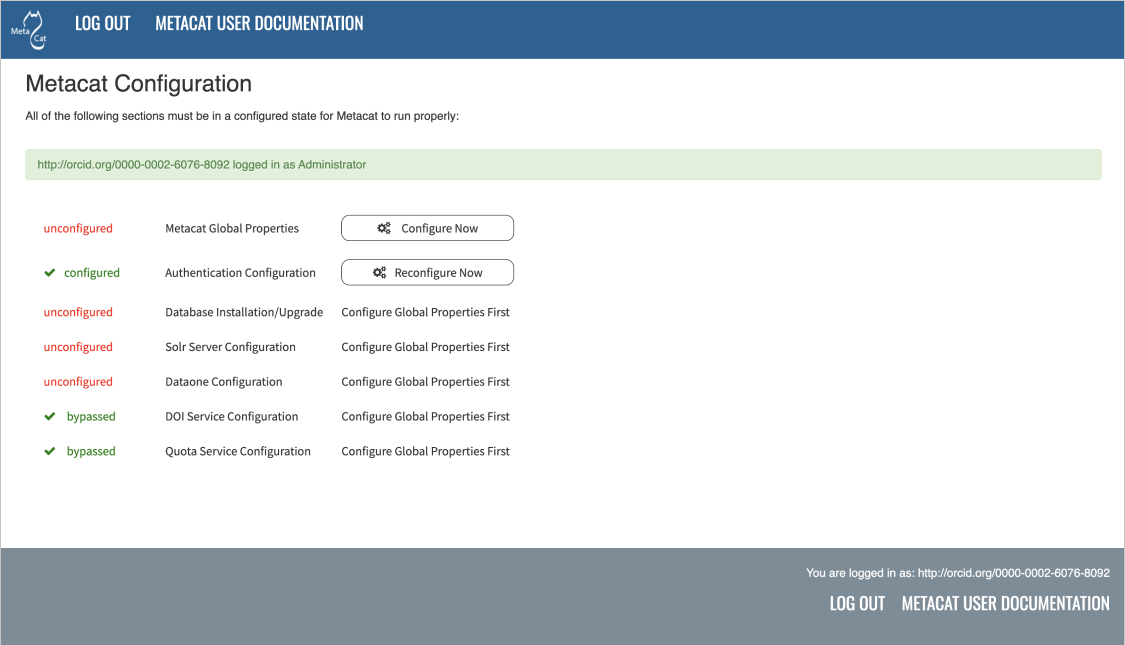
Metacat configuration menu, showing each configuration section. Once all sections are marked as
green configured (or complete or bypassed where relevant), Metacat can be accessed.
Configuration sections may have the following statuses (although not every status will be available for all sections):
Status |
Description |
|---|---|
unknown |
The section’s status is unknown, pending configuration of earlier sections |
unconfigured |
The section has yet to be configured |
in progress |
The section is in the process of being configured |
configured |
The section has been configured successfully |
complete |
The section has performed an upgrade that is now complete |
bypassed |
The administrator has chosen not to configure the section |
To the right of each configuration section is one of the following options: Configure Now, Reconfigure Now, Configure Global Properties First, Version: X.X.X, or Refresh page to update status.
If the option is a clickable link (e.g., Configure Now or Reconfigure Now), you can use the link to open the associated configuration settings and edit them. If the option is not linked, the settings cannot be specified until the global properties are set. Once the global properties are configured, the option to configure this section becomes available.
The Version: X.X.X option is used only for the Database Installation/Upgrade section. If the database schema version detected by Metacat matches the application version (e.g., 3.1.0), then no further database configuration is required. Otherwise, the database upgrade should be initiated by clicking the upgrade button on the database configuration page.
Since the database upgrade and the storage upgrade may take a long time to complete, you may see the Refresh page to update status option:
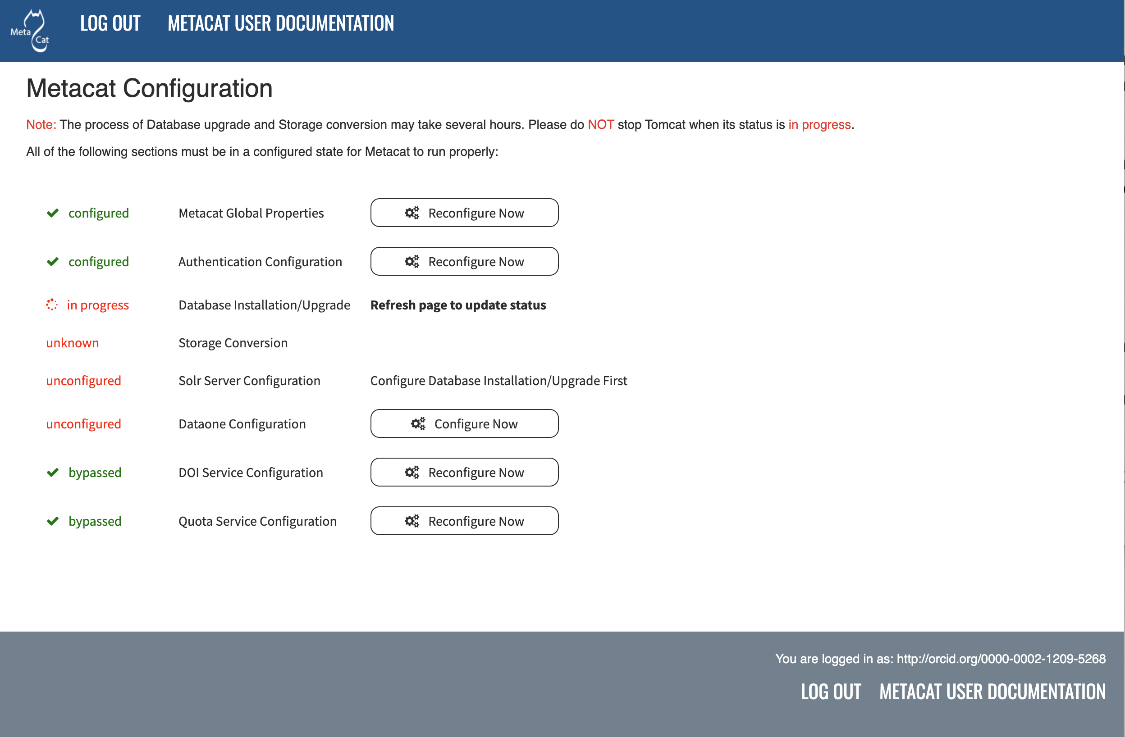
The Metacat settings as they appear when the database upgrade is in progress.
As indicated, you may refresh the page in your browser to see updates.
The Storage Conversion will start automatically, immediately after the database upgrade is finished. The Storage Conversion converts the existing file storage format to the new DataONE hashstore format, which introduces significant performance enhancements for managing large datasets. The Storage Conversion may take a long time to complete, depending on the number and size of the files in your repository. Again, you may refresh the page to see updates:
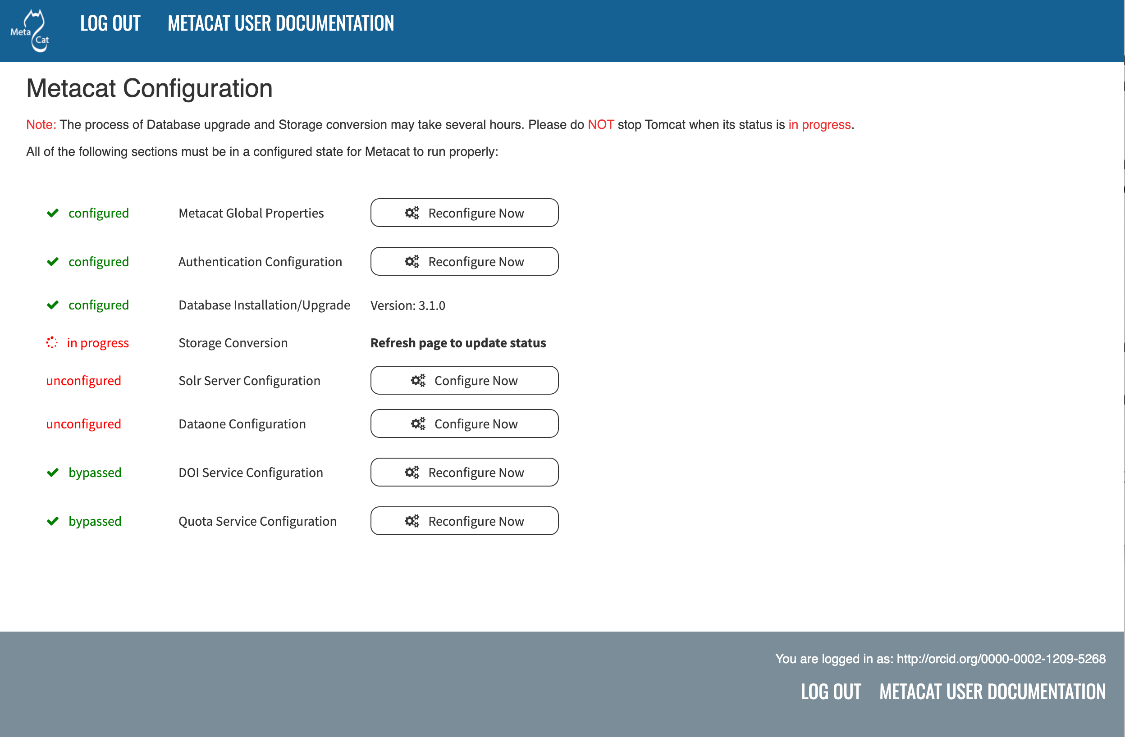
The Metacat settings as they appear when the storage upgrade is in progress.
All settings must be in a configured, complete or bypassed state in order to run
Metacat.
Reminder: If you are reconfiguring a running version of Metacat, you must restart the Tomcat server for the changes to take effect.
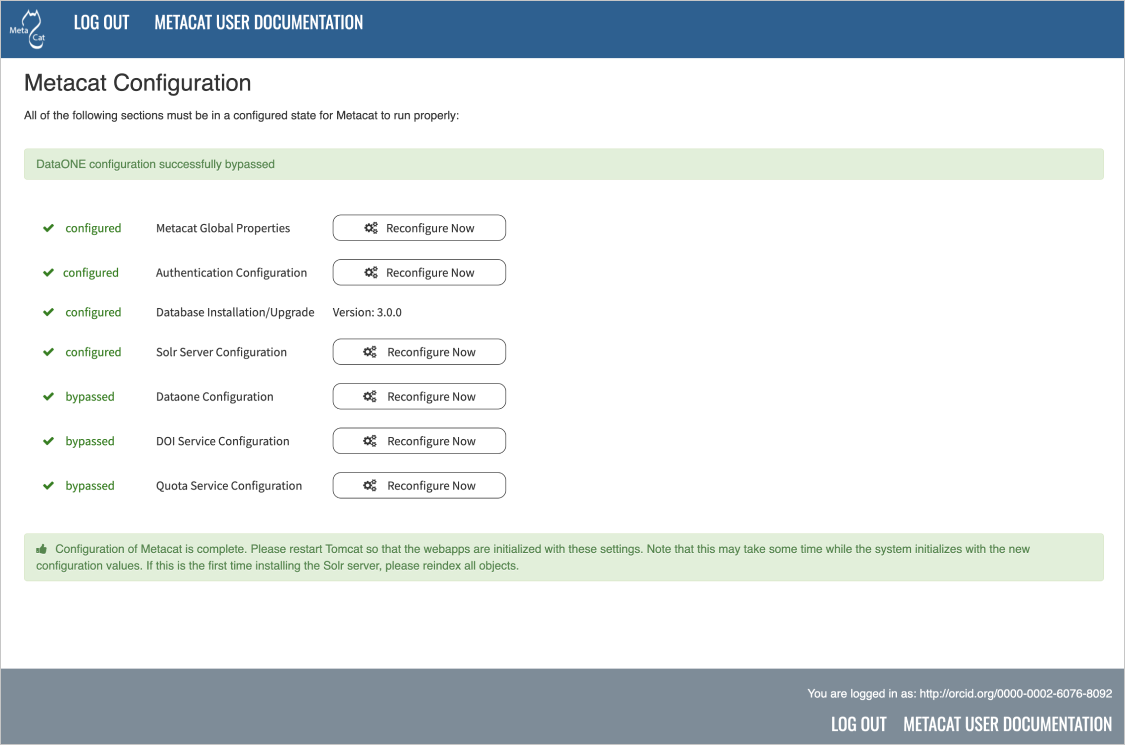
The Metacat settings as they appear after having been configured.
5.6. Global Properties
The Metacat configurations included under Global Properties represent the bulk of the settings required to run Metacat. Click a blue question-mark icon beside any setting for detailed instructions. More information about each property is also included in the Appendix: Metacat Properties.
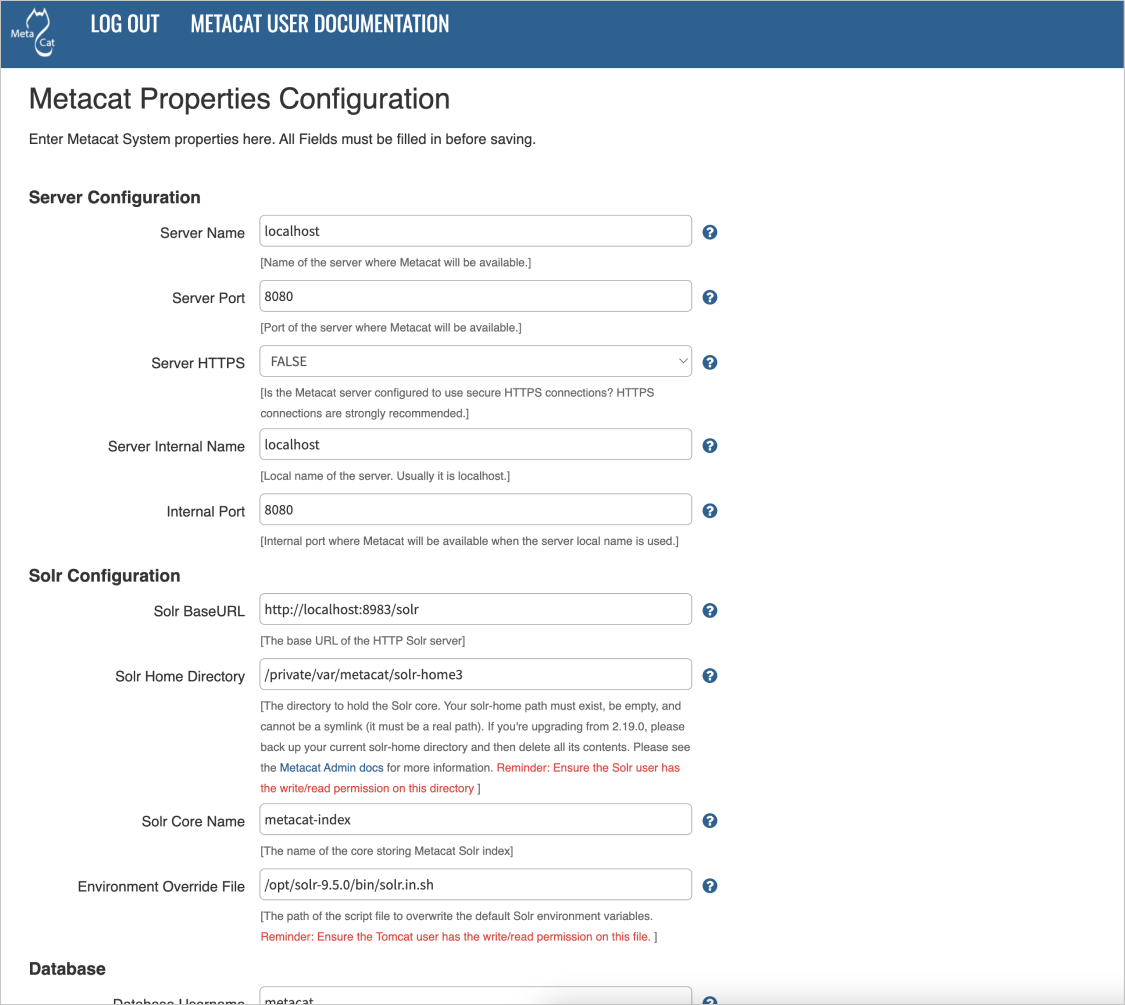
The Metacat Global Properties editing screen. Scrolling down will reveal additional global properties.
5.6.1. Metacat Initial Global Property Values
The first time you install Metacat, the system attempts to automatically detect the values for a number of settings (see table). It is important to ensure that the following values are the properties below are correct.
Note: When you save global properties, Metacat also saves a back-up file that is located in
/var/metacat/.metacat(on Linux). When you update Metacat, the system automatically locates the back-up file so you do not have to re-enter the configuration settings.
Property |
Description |
|---|---|
Metacat Context |
The name of the deployed Metacat WAR file (minus the .war extension). E.g., “metacat” |
Server Name |
The DNS name of the server hosting Metacat, not including port numbers or the protocol (”http://”). |
HTTP Port |
The non-secure port where Metacat will be available. |
HTTP SSL Port |
The secure port where Metacat will be available. |
Deploy Location |
The directory where the application is deployed. |
Site Properties Directory |
Directory in which to store the metacat-site.properties file. |
Object Storage Root Path |
The path to the root directory used for object storage. |
5.6.2. Solr Global Property Values
Please set the solr home directory property Solr Home Directory and ensure that the solr home
directory is writable/readable by the user solr.
Please ensure that the Environment Override File is writable/readable by the Tomcat user (ex. tomcat9).
Property |
Description |
|---|---|
Solr Home Directory |
The path to your solr-home (solr core). If you are upgrading Metacat from version 2.12.2 or earlier, please choose a different directory rather than the old one. |
Environment Override File |
The path of the script file to overwrite the default Solr environment variables. |
For additional details, please see the section of Tomcat And Solr User Management on the Solr installation page.
5.6.3. Token Configuration (for Metacat v3.0.0 only; SKIP for other versions!)
Note for Metacat v3.0.0 only:
A valid admin (auth) token and DataONE CA certificate are required for a Metacat v3.0.0 installation to handle private datasets correctly. Later versions (i.e. Metacat v.3.1.0 and above) do NOT require this special setup.
IMPORTANT: This should not be confused with configuring Metacat to act as a DataONE Member Node, which does still require a certificate. Details of that setup can be found in DataONE Member Node Support.
- We strongly recommend using the latest Matacat version, which will not require a token.**
However, if you need to run v3.0.0 for any reason, you can either:
- obtain a temporary auth token (each one is valid for only 24 hours) by logging into the
KNB website, and navigating to “My Profile” -> “Settings” -> “Authentication Token”, or
obtain a long-term auth token (valid for 1 year), by contacting DataONE.
Related properties, needed only for Metacat v3.0.0, are shown below:
Property |
Description |
|---|---|
Token Verification Certificates |
Semicolon-separated list of paths to certificate files, each containing a single public key (not a certificate chain). These will be used to verify incoming request jwt tokens, in addition to verifying against the CN server. |
Admin Token Path |
The path to the admin jwt token that will be used in dataone-indexer to access the private objects’ system metadata. |
5.6.3.1. The Admin Token (for Metacat v3.0.0 only; SKIP for other versions!)
After obtaining an admin (auth) token, save it to the default path (below). If you wish to save it
elsewhere, be sure to update the global properties’ Admin Token Path value with your custom path.
Default Value for the admin (auth) token:
/var/metacat/certs/token
5.6.3.2. Token Verification Certificate (for Metacat v3.0.0 only; SKIP for other versions!)
Next, you will need to obtain a DataONE Intermediate Certificate. Depending on your needs, there are two available:
Note: the DataONE Intermediate CA certificate is a single certificate, NOT a certificate chain!
After obtaining the certificate and saving it to your determined location, please set the value in
the following global property Token Verification Certificates with the path to the certificate.
5.7. Database Configuration
Because the Database Configuration is dependent on values specified in the Global Properties section, the link to these settings does not become active until after the global settings have been saved. Once the global settings have been saved, Metacat automatically detects the database schema version and upgrades it if necessary (and with your permission). There are two expected database configuration statuses:
New Installation
Upgrade
5.7.1. New Installation
If Metacat determines that your database is new, the Database Install/Upgrade utility lists the SQL scripts that will run in order to create a database schema for the new version of Metacat.
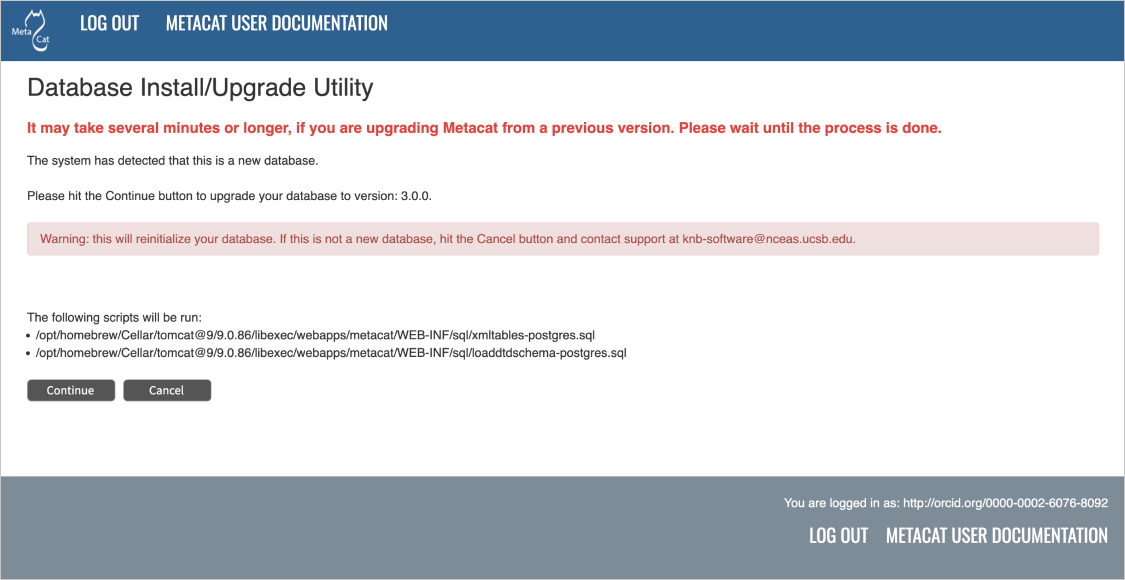
Database installation creates tables needed for Metacat.
If the database is not new, or if you have any questions about whether it is new or not, choose Cancel and contact support at knb-help@nceas.ucsb.edu.
When you choose Continue, Metacat runs the listed scripts and creates the database schema.
5.7.2. Upgrade
If Metacat identifies a previous database schema, the Database Install/Upgrade utility notes the existing version and lists the SQL scripts that will run in order to update the schema for the new version of Metacat.
If the detected schema version is incorrect, or if you have any questions about whether it is correct or not, click the Cancel button and contact support at knb-help@nceas.ucsb.edu. When you choose to continue, Metacat runs the listed scripts and updates the database schema.
Additional upgrade tasks may also run after the database upgrade is complete. For systems hosting large amounts of data, these upgrade routines can take time to complete. It is important to let the process complete before using Metacat otherwise your deployment may become unstable.
5.8. Solr Server Configuration
Because the Solr Server Configuration is dependent on values specified in the Global Properties section, the link to these settings does not become active until after the global settings have been saved. Once the global settings have been saved, Metacat automatically detects the status of the Solr Core and creates or upgrades it if necessary (and with your permission).
Note: Your Solr server should be running when you configure Metacat. If it is not, please see the Solr installation page.
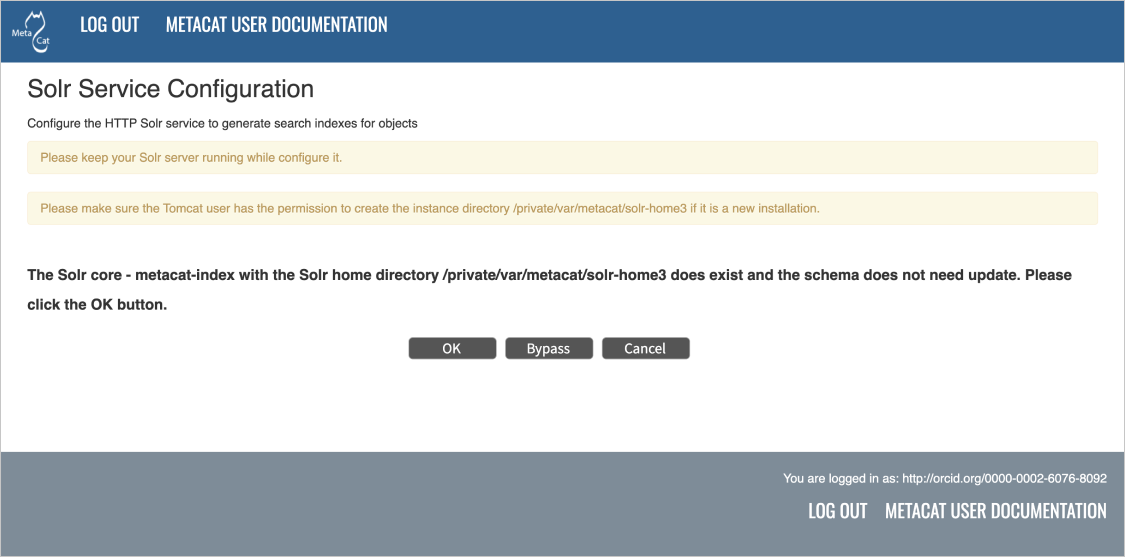
5.8.1. Solr Troubleshooting
If you click the Solr Configuration button and get the error message like
Server refused connection at: http://localhost:8983/solr, this means the
Solr server is not running and you need to start it.
If you click the Create button to create the Solr core and get an error message
like Couldn't persist core properties to /var/metacat/solr-home2/, this means
the solr user doesn’t have the write permission to the Solr Home directory. You need
to add the solr user to the tomcat group, restart Solr server and Tomcat, log in again
and continue to configure Metacat. The instructions for adding users to groups can be found in the
Tomcat And Solr User Management part of the Solr installation page.
5.9. DataONE Configuration
Metacat can be configured to operate as a Member Node within the DataONE federation of data repositories. See DataONE Member Node Support for background and details on DataONE and details about configuring Metacat to act as a DataONE Member Node.
5.10. DOI Service Configuration
Metacat can be configured to assign Digital Object Identifiers (DOIs) to metadata/data objects through a EZID service. Click a blue question-mark icon beside any setting for detailed instructions. More information about each property is also included in the Appendix: Metacat Properties.
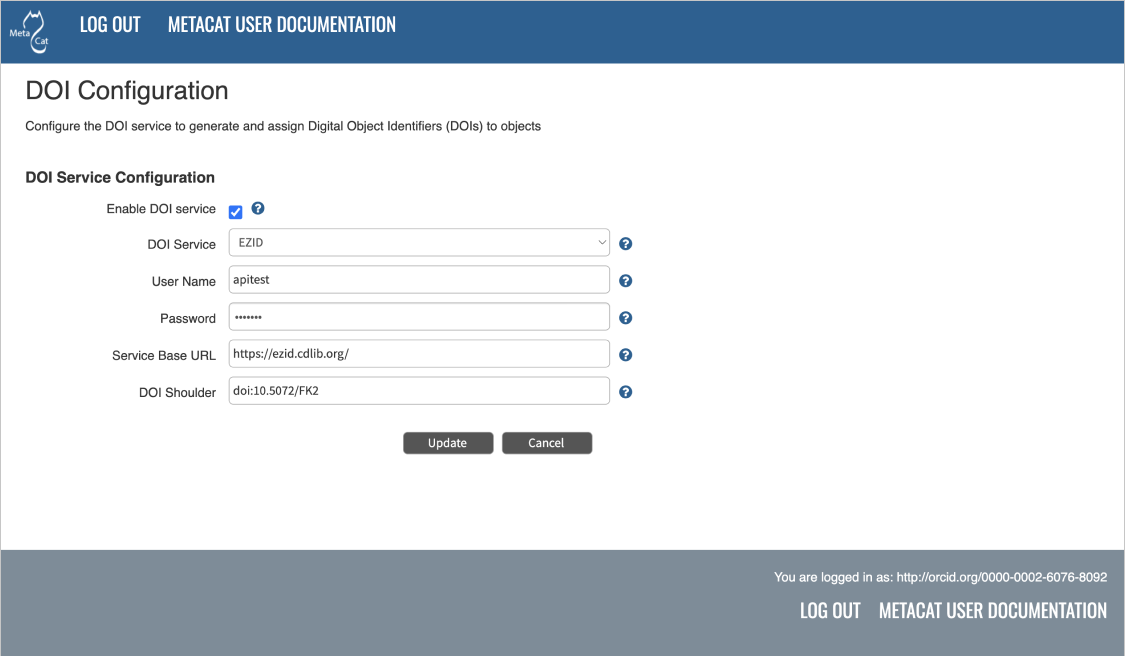
Configuring DOI Service Configuration with EZID service.
5.11. Additional Configuration
Metacat’s properties are managed and modified either through use of the form-based Metacat Configuration utility, or by being set directly via Metacat’s editable properties file (metacat-site.properties). More-detailed information is given in the following section.
5.11.1. Properties Files
Caution
Before making any changes to Metacat’s properties files, it is highly recommended that you first read Properties Overview, for a detailed overview of how properties are used and updated in Metacat.
In summary:
Metacat’s configuration settings are located in two files:
metacat.properties: a large, non-editable file, containing the default values for every single property recognized by Metacat, and
metacat-site.properties: a smaller, editable file, containing only the values that need to be changed to override the defaults.
More-dynamic settings (such as authorization and database connection values) are managed with the Metacat Configuration utility (see Configuring Metacat). Whenever these settings are changed from their defaults, the new values are automatically saved to metacat-site.properties.
More-static settings, which cannot be set via the Configuration utility, may also be changed in the metacat-site.properties file, either by editing existing property entries, or by adding them there if they do not already exist. Note that metacat.properties: should not be edited.
The default location for the metacat-site.properties file is
/var/metacat/config/metacat-site.properties, but note that this location may have been
changed via the Metacat Configuration utility. See Properties Overview for
more details.
For information about each property, and default or example settings, please see the Appendix: Metacat Properties. Properties that can only be edited manually in the metacat-site.properties file are highlighted in the appendix.
5.11.2. Secret Properties
Some properties hold sensitive information such as secret passwords. When these are entered via the Metacat Configuration Utility, they are saved as plain text in the metacat-site.properties file. If this causes security concerns, note that secrets may instead be passed to Metacat via environment variables.
Full details on how to set these values and how they are used by Metacat can be found in the Appendix, under: Secret Properties.
(e.g., default or nceas).
5.12. Read-only Mode
Metacat has a feature to place itself in read-only mode - its content can NOT be
modified; however, it can be read and searched. The default setting of Metacat is
not-read-only mode. You may make Metacat read-only by setting the value of a property to “true”
in the metacat-site.properties file, then restart Tomcat.
application.readOnlyMode=true
To cancel the read-only mode, set the property back to “false”, then restart Tomcat.
application.readOnlyMode=false
When Metacat is in read-only mode, the following DataONE API methods are disabled:
DataONE Member Node API
- MN.create
- MN.update
- MN.archive
- MN.delete
- MN.replicate
- MN.systemMetadataChanged
- MN.updateSystemMetadata
Methods on the DataONE Coordinating Node API are not disabled because the Coordinating Nodes currently have a different read-only mechanism.
5.13. MetacatUI Themes
Metacat’s default web interface metacatui can be easily modified. Please visit the metacatui docs to learn more and get started.

